接下来就是重头戏了,实现窗口的滚动效果。(仅Y轴滚动,如果要加入X轴滚动把Y轴内容复制一遍即可)
基础滚动
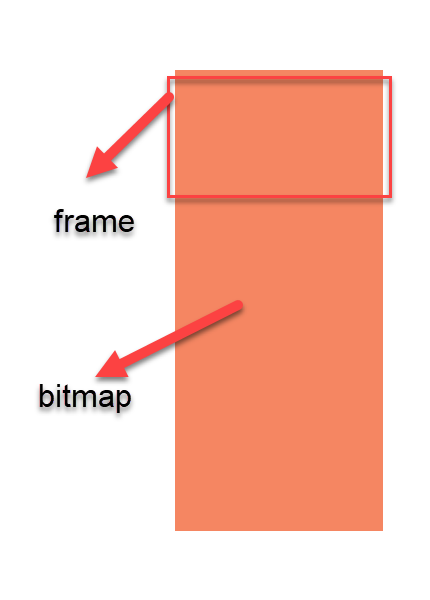
首先我们要继承之前的CustomWindow类,实现基本的外观以及点击交互效果。滚动效果的实现主要通过 Sprite.setFrame(x, y, w, h)方法,这个是个RMMV、MZ原生方法,效果是使 Sprite 仅显示其 Bitamp 的指定部分,我们事先画一个特别长的 Bitmap,比如600高度,然后根据滚动值显示其中的一部分,比如窗口高度300,滚动值100,那么 Sprite.setFrame(100, y, w, 300), 就只会显示高度100~400的区域,不断更新显示区域,就实现了滚动效果。
当然在这之前,我们需要先判定Bitmap的总高度,并记录滚动值:
1
2
3
4
5
6
7
8
9
| class ScrollWindow extends CustomWindow {
_scrollMin = 0;
_scrollMax = 0;
_scroll = 0;
_scrolling = 0;
get scroll() {return this._scroll + this._scrolling;}
}
|
接下来便是相应鼠标操作改变滚动值:
1
2
3
4
5
6
7
8
9
10
11
12
13
14
15
|
UpdateScroll() {
if (this.IsPressed()) {
const y = TouchInput.y;
this._scrolling = y - this._pressPoint.y;
}
}
OnRelease() {
super.OnRelease();
this._scroll += this._scrolling;
this._scrolling = 0;
}
|
接下来要根据滚动值设置 Bitmap的显示区域,比较简单:
1
2
3
| UpdateContentScroll() {
this._contentSprite.setFrame(0, -this.scroll, this.width, this.contentHeight);
}
|
滚动极限
这一部分主要实现滚动超过边界时的“回弹”效果。首先需要设定边界值:
1
2
3
4
5
6
7
8
9
10
11
12
13
14
15
16
17
18
|
SetContentLength(l) {
if ( l > this.contentHeight) {
this._scrollMin = this.contentHeight - l;
this.RefreshContent();
} else {
this.content.clear();
}
}
RefreshContent() {
this._contentSprite.bitmap = new Bitmap(this.contentWidth, this.contentHeight - this._scrollMin);
this._contentSprite.move(this.paddings.left, this._titleHeight + this.paddings.top);
this.UpdateContentScroll();
}
|
处理超过边界时的回弹效果,,我这里的做法是超过边界时,每次update减少超过值得1/3,可以根据实际效果用不同的值,看个人喜好了:
1
2
3
4
5
6
7
8
9
10
11
| UpdateBorderBouncing() {
if (this._scroll > this._scrollMax) {
this._scroll -= (this._scroll - this._scrollMax) / 3;
if (this._scroll - this._scrollMax < 1) this._scroll = this._scrollMax;
}
if (this._scroll < this._scrollMin) {
this._scroll -= (this._scroll - this._scrollMin) / 3;
if (this._scrollMin - this._scroll < 1) this._scroll = this._scrollMin;
}
}
|
滚动惯性
也就是在松开鼠标后,滚动不会立即停止,而是会继续滑动一段距离。且松开前鼠标移动得越快,应该滑动初速度也应该越快,并随时间而减小,直到静止:
1
2
3
4
5
6
7
8
9
10
11
| _inertia = 0;
_lastY = 0;
UpdateScroll() {
if (this.IsPressed()) {
const y = TouchInput.y;
this._scrolling = y - this._pressPoint.y;
this._inertia = y - this._lastY;
this._lastY = y;
}
}
|
接下来处理松开后的惯性即可:
1
2
3
4
5
6
7
8
|
static get inertiaAttenuation() { return 0.94; }
UpdateInertia() {
if (!this.IsPressed() && (this._inertia > 1 || this._inertia < -1)) {
this._scroll += this._inertia;
this._inertia = this._inertia * ScrollWindow.inertiaAttenuation;
}
}
|
效果
最后把需要帧更新的放到 update 中就完成了
1
2
3
4
5
6
7
8
| update() {
super.update();
this.UpdateInertia();
this.UpdateScroll();
this.UpdateBorderBouncing();
this.UpdateContentScroll();
this.UpdateScrollBar();
}
|