永远庭

Domus Hominis Ludentis

0%

内容基本参考 https://kurozael.github.io/typescript-pixi-gulp-tutorial/ ,有所修改。

安装 Node

从 node.js 官网 https://nodejs.org 下载并安装,不再赘述。

开始项目

随便在哪里建一个文件夹,就叫 demo 吧,然后在文件夹中打开终端,首先需要修改 npm 的源,不然速度会很慢。可以使用淘宝的数据源:

1
npm config set registry https://registry.npm.taobao.org

然后输入npm init 启动项目即可。

安装依赖

首先安装 gulp: npm install -g gulp

安装完成后,使用 npm install --save <package name> 安装依赖包,由于我们用 ts 构建项目,推荐安装以下包:

  • @types/node
  • vinyl-source-stream
  • vinyl-buffer
  • gulp-typescript
  • typescript
  • browserify
  • browser-sync
  • fast-glob
  • pixi.js
  • fs

TS配置

在根目录建立一个 tsconfig.js 文件,内容如下:

1
2
3
4
5
6
7
8
{
"compilerOptions": {
"target": "es6",
"allowSyntheticDefaultImports": true,
"esModuleInterop": true,
"module": "commonjs",
},
}

项目结构

在根目录创建 src, build, release 三个文件夹(也可以任意命名),分别存放 ts 源码文件,编译后的 js 文件,以及最终打包的文件。

配置gulp

在根目录创建 gulpfile.js 文件,填入以下内容:

1
2
3
4
5
6
7
8
9
10
11
12
13
14
15
16
17
18
19
20
21
22
23
24
25
26
27
28
29
30
31
32
33
34
35
36
37
38
39
40
41
42
43
44
45
46
47
48
49
50
51
var gulp = require("gulp");
var tsc = require("gulp-typescript");
var fs = require("fs");

var project = tsc.createProject("tsconfig.json");

gulp.task("build", function(done) {
var gameSrc = ["src/**/**.ts"];
var builder = gulp.src(gameSrc)
.pipe(project())
.js
.pipe(gulp.dest("build/"));
return builder;
});

var browserify = require("browserify");
var source = require("vinyl-source-stream");
var buffer = require("vinyl-buffer");

gulp.task("bundle", gulp.series("build", function(done) {
var outputFolder = "release/";
var outputFileName = "js/app.js";
var mainTsFilePath = "build/main.js";

var bundler = browserify({
paths: ["./build"],
debug: false,
standalone: outputFileName
});

var output = bundler.add(mainTsFilePath).bundle()
.pipe(source(outputFileName))
.pipe(buffer())
.pipe(gulp.dest(outputFolder));
return output;
}));

var browserSync = require("browser-sync");

gulp.task("serve", gulp.series("bundle", function(done) {
var outputFolder = "release/";
browserSync.init({
server: {
baseDir: outputFolder
},
codeSync: false,
online: true,
cors: true
});
done();
}));

然后就可以在根目录通过 gulp build 命令编译 src 中的 ts 文件;通过gulp bundle打包编译后的 js 到 release 文件夹;通过gulp serve 开启本地服务器测试项目。(ps. bundle 命令会先执行 build, serve 命令会先执行 build 和 bundle)

开始写Demo

在 src 目录下新建一个ts文件 main.ts;写入如下代码:

1
2
3
4
5
6
7
8
9
10
11
12
13
14
15
16
// 引入 pixi 包
import * as PIXI from 'pixi.js';

//新建 app
const app = new PIXI.Application({width: 1280, height: 720});

//将 pixi 元素添加到页面
window.onload = () => {
document.body.appendChild(app.view as HTMLCanvasElement);
//讲app对象添加到窗口属性,方面调试,
(<any>window).app = app;
};

//随便画个什么,看看效果
let t = new PIXI.Text('测试', { fontSize: 24, fill: 0x0x4caf50});
app.view.addChild(t);

保存后在终端执行 gulp serve 就可以看到效果了。

A map editor for Fire Emblem Heroes
Author: araragi.hoozuki@yandex.ru (Lohengriny)

Resources

  • root/Face: Face Images(from assets/common/face)
  • root/Field: Map backgrounds(from assets/common/field)
  • root/SRPG/Person: Unit files(from assets/common/srpg/person)
  • root/SRPG/Enemy: Enemy files(from assets/common/srpg/enemy)
  • root/SRPG/Skill: Skill files(from assets/common/srpg/skill)
  • root/UI: Ui(from assets/common/ui, MiniFace.png, Skill_Passive.png and Status.png are needed)
  • root/Data: text files(Located in language folder, eg. assets/USEN/Message/Data)
    Just copy these files from game folder(com.nintendo.zaba/files/assets/)

Environments

  • netcore 5.0
  • 700+ MB RAM (Because of face image cache, too lazy to improove this XDD)

Instructions

Load Map

Click “Load SRPGMap”,and select a map file(map files are placed at assets/common/srpgmap/*.bin.lz), it is recommended to select maps whose name starts with S, which are story maps.

Terrain Edit

  • Field id: Backgroud image name,relaod map if changed.
  • Selected Coordiante: x, y value of selected tile
  • Terrain Type: Just terrain type…

Unit edit

  • Unit Id: Double click and select an unit. Delete this to delete an unit
  • Lv: level
  • Tlv: true level
  • SpecialCD: 255 for default, 0 for special ready
  • HP etc: Has a cap of 99。When you select a unit in the “unit id” slot, these field will be automatically filled.
  • Is Enemy?: 0 for ally,1 for enemy
  • Skills: Double click to open skill list window,and double click to select a skill

Save

Click “Save Map” to save your edited map,the program needs overwrite the original file. So do not rename, move or delete the original map file.

Download

Dropbox

一个《火焰纹章:英雄》地图文件编辑工具
作者: araragi.hoozuki@yandex.ru (贴吧 bombra, Nga 罗恩格林妮)

需要资源文件

  • root/Face: 存放头像文件,
  • root/Field: 存放地图背景文件
  • root/SRPG/Person: 存放角色文件
  • root/SRPG/Skill: 存放技能文件
  • root/UI: 存放UI相关文件(仅需要 MiniFace.png, Skill_Passive*.png, Status.png)
  • root/Data: 存放文本说明文件
    以上文件均可以从游戏数据包中获取,文本说明文件在对应的语言文件夹下。缺少文件可能会导致程序无法打开或者崩溃

基本用法

运行环境

  • netcore 5.0
  • 600+ MB 内存。图像缓存占大头,懒得优化(

    读取地图文件

    点击 Load SRPGMap 按钮,在弹出的窗口中选择需要的地图配置文件(地图文件位于游戏数据 files/assets/common/srpgmap/*.bin.lz),建议选择 S 开头的文件(剧情地图)。然后点击地图上的格子以选取

地形编辑

  • Field id: 地图背景文件,对应 Field 目录下的文件,修改后重新载入地图才会刷新,修改成不存在的文件会出错(应该)
  • Selected Coordiante: 显示当前选择的格子坐标
  • Terrain Type: 当前选择的格子地形,修改可能会造成地图无法在游戏中载入

角色编辑

  • Unit Id: 角色id,双击打开角色选择窗口,第一次打开时会卡一会,读取头像数据。然后点击角色名选择,id会自动填入。删除id会删除该角色。
  • Lv: 等级
  • Tlv: 真实等级,等级为40,真实等级为40以上时,游戏里显示为40+
  • SpecialCD: 开局时奥义cd,255 为默认,0为就绪状态
  • HP等: 属性,直接修改即可,超过99无效。选择 Unit Id时,属性会自动填入满破标准属性作为参考
  • Is Enemy?: 0 表示友军,1表示敌人
  • 技能栏: 双击弹出技能选择窗口,然后双击技能选择

以上手动输入的地方,需要输入后点击其他输入框以确认,否则数据不会更新
新增角色时,需要再点击一次地图上的格子以刷新显示

保存

点击 Save Map 保存文件,会自动覆盖原文件(也必须覆盖原文件,因此保存前请勿删除或移动原文件)。覆盖前建议备份原文件。

其他

  • 敌方专属角色(大众脸等),在地图上头像会显示为全黑,以后有心情再增加头像(
  • 一个位置只能设置一个角色,因此部分有增援敌人的地图,如果有增援敌人在同一位置出现,会丢失部分信息。当然,暂时也还不支持设置增援信息

下载

百度盘

提取码:bdm4

数据类型 X18XOR

1
2
3
4
5
6
7
8
9
10
11
12
13
14
15
16
17
18
19
20
21
22
23
24
25
26
27
28
29
30
31
32
33
34
35
36
37
38
39
40
41
42
43
44
45
46
47
48
49
50
51
52
53
54
55
56
57
58
59
60
61
62
63
64
65
66
67
68
69
70
71
72
73
74
75
76
77
78
79
80
81
82
83
84
85
86
87
88
89
90
91
92
93
94
95
96
alloc(ConvertRoutine,1024)
alloc(ConvertBackRoutine,1024)
alloc(TypeName,256)
alloc(ByteSize,4)
alloc(UsesFloat,1)
alloc(CallMethod,1)
alloc(PREFEREDALIGNMENT,4)
PREFEREDALIGNMENT:
dd 4

TypeName:
db 'X18 XOR',0

ByteSize:
dd 36

UsesFloat:
db 0 //Change to 1 if this custom type should be treated as a float

CallMethod:
db 1 //Remove or change to 0 for legacy call mechanism

//The convert routine should hold a routine that converts the data to an integer (in eax)
//function declared as: cdecl int ConvertRoutine(unsigned char *input, PTR_UINT address);
//Note: Keep in mind that this routine can be called by multiple threads at the same time.
ConvertRoutine:
//jmp dllname.functionname
[64-bit]
//or manual:
//parameters: (64-bit)
//rcx=address of input
//rdx=address
mov eax,[rcx] //eax now contains the bytes 'input' pointed to
xor eax,[rcx+18]

ret
[/64-bit]

[32-bit]
//jmp dllname.functionname
//or manual:
//parameters: (32-bit)
push ebp
mov ebp,esp
//[ebp+8]=address of input
//[ebp+c]=address
//example:

push ebx
mov ebx,[ebp+8] //place the address that contains the bytes into eax
mov eax,[ebx] //place the bytes into eax so it's handled as a normal 4 byte value
xor eax,[ebx+18]

pop ebx

pop ebp
ret
[/32-bit]

//The convert back routine should hold a routine that converts the given integer back to a row of bytes (e.g when the user wats to write a new value)
//function declared as: cdecl void ConvertBackRoutine(int i, PTR_UINT address, unsigned char *output);
ConvertBackRoutine:
//jmp dllname.functionname
//or manual:
[64-bit]
//parameters: (64-bit)
//ecx=input
//rdx=address
//r8=address of output
//example:
xor ecx,[r8+18]
mov [r8],ecx //place the integer at the 4 bytes pointed to by r8

ret
[/64-bit]

[32-bit]
//parameters: (32-bit)
push ebp
mov ebp,esp
//[ebp+8]=input
//[ebp+c]=address
//[ebp+10]=address of output
//example:
push eax
push ebx
mov eax,[ebp+8] //load the value into eax
mov ebx,[ebp+10] //load the output address into ebx
xor eax,[ebx+18]
mov [ebx],eax //write the value into the address
pop ebx
pop eax

pop ebp
ret
[/32-bit]

LUA 函数

方便操作, F2自动修改并锁定单位属性;F3自动修改并锁定一个x18xor值;F4自动将当前选中 record 的技能替换为搜索结果的第一个。

1
2
3
4
5
6
7
8
9
10
11
12
13
14
15
16
17
18
19
20
21
22
23
24
25
26
27
28
29
30
31
32
33
34
35
36
37
38
39
40
41
42
43
44
45
46
47
48
49
50
51
52
53
54
55
56
57
58
59
60
61
62
63
64
65
66
67
68
69
70
71
72
73
74
75
76
77
78
79
80
81
82
83
84
85
86
87
88
function Operate()
sp1 = getAddressList().getMemoryRecordByDescription("sp1")
sp2 = getAddressList().getMemoryRecordByDescription("sp2")
sp3 = getAddressList().getMemoryRecordByDescription("sp3")
r1 = getAddressList().getMemoryRecordByDescription("r1")
r2 = getAddressList().getMemoryRecordByDescription("r2")
r3 = getAddressList().getMemoryRecordByDescription("r3")
ir1 = getAddressList().getMemoryRecordByDescription("ir1")
ir2 = getAddressList().getMemoryRecordByDescription("ir2")
ir3 = getAddressList().getMemoryRecordByDescription("ir3")
lv1 = getAddressList().getMemoryRecordByDescription("lv1")
lv2 = getAddressList().getMemoryRecordByDescription("lv2")
lv3 = getAddressList().getMemoryRecordByDescription("lv3")
mg1 = getAddressList().getMemoryRecordByDescription("+1")
mg2 = getAddressList().getMemoryRecordByDescription("+2")
mg3 = getAddressList().getMemoryRecordByDescription("+3")

base = getAddressList().SelectedRecord.getAddress()
sp1.setAddress(base)
sp2.setAddress(string.format("%X",tonumber(sp1.getAddress(), 16) + 0x18))
sp3.setAddress(string.format("%X",tonumber(sp2.getAddress(), 16) + 0x18))
sp2.Value = tonumber(sp1.Value) ~ 9999

r1.setAddress(string.format("%X" ,tonumber(base,16) - 0x318))
r2.setAddress(string.format("%X",tonumber(r1.getAddress(), 16) + 0x18))
r3.setAddress(string.format("%X",tonumber(r2.getAddress(), 16) + 0x18))
r2.Value = tonumber(r1.Value) ~ 5

ir1.setAddress(string.format("%X" ,tonumber(base,16) - 0x2d0))
ir2.setAddress(string.format("%X",tonumber(ir1.getAddress(), 16) + 0x18))
ir3.setAddress(string.format("%X",tonumber(ir2.getAddress(), 16) + 0x18))
ir2.Value = tonumber(ir1.Value) ~ 5

lv1.setAddress(string.format("%X" ,tonumber(base,16) - 0x1b0))
lv2.setAddress(string.format("%X",tonumber(lv1.getAddress(), 16) + 0x18))
lv3.setAddress(string.format("%X",tonumber(lv2.getAddress(), 16) + 0x18))
lv2.Value = tonumber(lv1.Value) ~ 40

mg1.setAddress(string.format("%X" ,tonumber(base,16) - 0x288))
mg2.setAddress(string.format("%X",tonumber(mg1.getAddress(), 16) + 0x18))
mg3.setAddress(string.format("%X",tonumber(mg2.getAddress(), 16) + 0x18))
mg2.Value = tonumber(mg1.Value) ~ 10

sp1.Active = true
sp2.Active = true
sp3.Active = true
r1.Active = true
r2.Active = true
r3.Active = true
ir1.Active = true
ir2.Active = true
ir3.Active = true
lv1.Active = true
lv2.Active = true
lv3.Active = true
mg1.Active = true
mg2.Active = true
mg3.Active = true
end

function X18Lock()
rec = getAddressList().SelectedRecord
xorer = getAddressList().createMemoryRecord()
xorer.setAddress(string.format("%X", rec.CurrentAddress + 0x18))

ver = getAddressList().createMemoryRecord()
ver.setAddress(string.format("%X", xorer.CurrentAddress + 0x18))

rec.Type = 2
xorer.Value = tonumber(rec.Value) ~ 999999
rec.Active = true
xorer.Active = true
ver.Active = true
end

function ReplaceSkills()
ms=getCurrentMemscan()
fl=memscan_getAttachedFoundlist(ms)

addr0 = getAddressList().SelectedRecord.CurrentAddress + 0x40
addr1 = tonumber(foundlist_getAddress(fl,0), 16) + 0x40
tb = readBytes(addr1, 560, true)
writeBytes(addr0, tb)
end

createHotkey(Operate, VK_F2)
createHotkey(X18Lock, VK_F3)
createHotkey(ReplaceSkills, VK_F4)

首先,使用之前别忘记Needs["NETLink\“];InstallNET[];`

DefineDLLFunction

本函数可以用来定义 DLL 中的函数到 Mathematica 中, 格式如下:

1
2
3
GetCursorPos = 
DefineDLLFunction["GetCursorPos", "user32.dll",
"BOOL", {"System.Drawing.Point&"}, ReferencedAssemblies -> {"System.Drawing"}]

{} 中为参数类型列表,用字符串表示,引用传值直接加上 outref 即可,如 {"ref IntPtr"}, 也可以如同上方例子,使用 &; 如果需要用到某些类,又不想 LoadNETAssemble[], 就可以直接使用 ReferencedAssemblies

一些常用 API

鼠标控制

鼠标事件:MouseEvent = DefineDLLFunction["mouse_event", "user32.dll", "int", {"int", "int", "int", "int", "int"}];
第一参数为键,后面4个参数一般直接为0即可。键值如下:

1
2
3
4
5
6
7
8
MOUSEEVENTF_MOVE:表明发生移动。
MOUSEEVENTF_LEFTDOWN:表明接按下鼠标左键。
MOUSEEVENTF_LEFTUP:表明松开鼠标左键。
MOUSEEVENTF_RIGHTDOWN:表明按下鼠标右键。
MOUSEEVENTF_RIGHTUP:表明松开鼠标右键。
MOUSEEVENTF_MIDDLEDOWN:表明按下鼠标中键。
MOUSEEVENTF_MIDDLEUP:表明松开鼠标中键。
MOUSEEVENTF_WHEEL:在Windows NT中如果鼠标有一个轮,表明鼠标轮被移动。移动的数量由dwData给出。

获取鼠标位置: SetCursorPos = DefineDLLFunction["SetCursorPos", "user32.dll", "int", {"int", "int"}];

窗口截图相关

用到的 Api 如下:

1
2
3
4
5
6
7
8
9
GetWindowRect = DefineDLLFunction["GetWindowRect", "user32.dll", "BOOL", {"HWND", "System.Drawing.Rectangle&"}, ReferencedAssemblies->{"System.Drawing"}];
FindWindow=DefineDLLFunction["FindWindow", "user32.dll", "HWND", {"String","String"}];
GetWindowDC=DefineDLLFunction["GetWindowDC", "user32.dll", "IntPtr", {"HWND"}];
CreateCompatibleBitmap=DefineDLLFunction["CreateCompatibleBitmap","gdi32.dll","IntPtr",{"IntPtr","int","int"}];
CreateCompatibleDC=DefineDLLFunction["CreateCompatibleDC","gdi32.dll","IntPtr",{"IntPtr"}];
SelectObject=DefineDLLFunction["SelectObject","gdi32.dll","IntPtr",{"IntPtr","IntPtr"}];
deleteObject=DefineDLLFunction["DeleteObject","gdi32.dll","int",{"IntPtr"}];
deleteDC=DefineDLLFunction["DeleteDC","gdi32.dll","int",{"IntPtr"}];
PrintWindow=DefineDLLFunction["PrintWindow","user32.dll","BOOL",{"IntPtr","IntPtr","UInt32"}];

实际操作过程:

1
2
3
4
5
6
7
8
9
10
11
12
13
14
15
SnapWindow[name_String:"Minesweeper Clone"]:=Block[
{handle,hscrdc,bptr,bdc,result},
handle=FindWindow[Null,name];
hscrdc=GetWindowDC[handle];
If[GetWindowRect[handle,rect]==1,,Return["Window Not Found!"];];
bptr=CreateCompatibleBitmap[hscrdc,rect@Width-rect@X,rect@Height-rect@Y];
bdc=CreateCompatibleDC[hscrdc];
SelectObject[bdc,bptr];
PrintWindow[handle,bdc,0];
result=Bitmap`FromHbitmap[bptr];
deleteDC[hscrdc];
deleteObject[bptr];
deleteDC[bdc];
Bitmap2Image@result
]

最后一步,需要将 Bitmap转化为 Mathematica 图片,函数如下:

1
2
3
4
5
6
7
8
9
10
11
12
13
14
15
16
    Bitmap2Image[bitmap_]:=Block[{img,width,height,lock,stride,intPtr,totalB,byte,data,},
LoadNETType/@{"System.Drawing.Imaging.ImageLockMode","System.Runtime.InteropServices.Marshal"};
img=result;
width=img[Width];
height=img[Height];
lock=img[LockBits[Rectangle`FromLTRB[0,0,width,height],ImageLockMode`ReadWrite,img[PixelFormat][Format24bppRgb]]];
stride=Abs[lock[Stride]];
intPtr=lock[Scan0];
totalB=stride*height;
byte=NETNew["System.Byte[]",totalB];
Marshal`Copy[intPtr,byte,0,totalB];
data=NETObjectToExpression[byte];
Marshal`Copy[byte,0,intPtr,totalB];
img[UnlockBits[lock]];
img=Image[Map[Reverse/@Partition[#,3]&,Partition[data,width*3,stride]],"Byte"]
];

接下来就是重头戏了,实现窗口的滚动效果。(仅Y轴滚动,如果要加入X轴滚动把Y轴内容复制一遍即可)

基础滚动

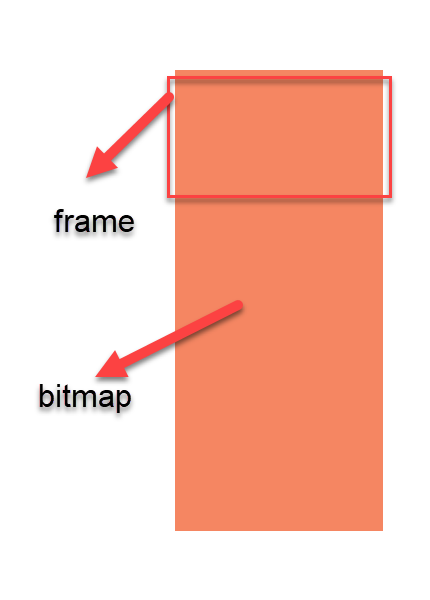
首先我们要继承之前的CustomWindow类,实现基本的外观以及点击交互效果。滚动效果的实现主要通过 Sprite.setFrame(x, y, w, h)方法,这个是个RMMV、MZ原生方法,效果是使 Sprite 仅显示其 Bitamp 的指定部分,我们事先画一个特别长的 Bitmap,比如600高度,然后根据滚动值显示其中的一部分,比如窗口高度300,滚动值100,那么 Sprite.setFrame(100, y, w, 300), 就只会显示高度100~400的区域,不断更新显示区域,就实现了滚动效果。

2021-02-26_22-27-11.png

当然在这之前,我们需要先判定Bitmap的总高度,并记录滚动值:

1
2
3
4
5
6
7
8
9
class ScrollWindow extends CustomWindow {

_scrollMin = 0; //最小滚动值,注意往上滚动是负数值,这个最小滚动值就是网上滚动的最大距离,相应的 Bitmap 高度就是窗口高度-最小滚动值;比如窗口高300,最小滚动值-200,那么就是可以最多向上滚动200距离,而整个 Bitmap的高度为500.
_scrollMax = 0; //一般默认为0,不能从初始位置向上滚动
_scroll = 0; //当前的滚动值
_scrolling = 0; //临时滚动值,即按下鼠标后移动的距离,松开鼠标后清零并归入 _scroll 中

get scroll() {return this._scroll + this._scrolling;} //实时总滚动值
}

接下来便是相应鼠标操作改变滚动值:

1
2
3
4
5
6
7
8
9
10
11
12
13
14
15
//在update函数中加入该函数,记录当前鼠标于按下时位置的 y 轴差值作为临时滚动值。
// Clickable._pressPoint 的定义如果忘记请参照之前内容
UpdateScroll() {
if (this.IsPressed()) {
const y = TouchInput.y;
this._scrolling = y - this._pressPoint.y;
}
}

//释放鼠标时,将临时滚动值并入,同时清空临时滚动值
OnRelease() {
super.OnRelease();
this._scroll += this._scrolling;
this._scrolling = 0;
}

接下来要根据滚动值设置 Bitmap的显示区域,比较简单:

1
2
3
UpdateContentScroll() {
this._contentSprite.setFrame(0, -this.scroll, this.width, this.contentHeight);
}

滚动极限

这一部分主要实现滚动超过边界时的“回弹”效果。首先需要设定边界值:

1
2
3
4
5
6
7
8
9
10
11
12
13
14
15
16
17
18
/**
* 改变滚动极限值会改变Bitmap尺寸,因此需要重新绘制 content
* @param {number} l
*/
SetContentLength(l) {
if ( l > this.contentHeight) {
this._scrollMin = this.contentHeight - l; //这里以内容总高度l作为参数,则 _scrollMin 就是(窗口高度 - l)
this.RefreshContent();
} else {
this.content.clear();
}
}

RefreshContent() {
this._contentSprite.bitmap = new Bitmap(this.contentWidth, this.contentHeight - this._scrollMin);
this._contentSprite.move(this.paddings.left, this._titleHeight + this.paddings.top);
this.UpdateContentScroll();
}

处理超过边界时的回弹效果,,我这里的做法是超过边界时,每次update减少超过值得1/3,可以根据实际效果用不同的值,看个人喜好了:

1
2
3
4
5
6
7
8
9
10
11
UpdateBorderBouncing() {
if (this._scroll > this._scrollMax) {
this._scroll -= (this._scroll - this._scrollMax) / 3;
if (this._scroll - this._scrollMax < 1) this._scroll = this._scrollMax;
}

if (this._scroll < this._scrollMin) {
this._scroll -= (this._scroll - this._scrollMin) / 3;
if (this._scrollMin - this._scroll < 1) this._scroll = this._scrollMin;
}
}

滚动惯性

也就是在松开鼠标后,滚动不会立即停止,而是会继续滑动一段距离。且松开前鼠标移动得越快,应该滑动初速度也应该越快,并随时间而减小,直到静止:

1
2
3
4
5
6
7
8
9
10
11
_inertia = 0; //记录当前的惯性滑动速度
_lastY = 0; //记录上一帧的滚动 y 值,以便和当前帧比较,得出该帧 y 的改变量,也就是滚动速度
//改造 UpdateScroll 函数如下:
UpdateScroll() {
if (this.IsPressed()) {
const y = TouchInput.y;
this._scrolling = y - this._pressPoint.y;
this._inertia = y - this._lastY;
this._lastY = y;
}
}

接下来处理松开后的惯性即可:

1
2
3
4
5
6
7
8
//惯性速度衰减率,我计划所有窗口都是一样的,所以作为静态属性,如果希望各个不同可以改为成员属性
static get inertiaAttenuation() { return 0.94; }
UpdateInertia() {
if (!this.IsPressed() && (this._inertia > 1 || this._inertia < -1)) { //只有在鼠标松开时惯性生效
this._scroll += this._inertia;
this._inertia = this._inertia * ScrollWindow.inertiaAttenuation;
}
}

效果

最后把需要帧更新的放到 update 中就完成了

1
2
3
4
5
6
7
8
update() {
super.update();
this.UpdateInertia();
this.UpdateScroll();
this.UpdateBorderBouncing();
this.UpdateContentScroll();
this.UpdateScrollBar();
}

2021-02-26_22-23-33.gif

原生的UI实在是太丑了,而且对触屏、滑动等的支持也不太好,我们需要重新构建一个。

功能构想

我期望的UI主要有窗口和按钮构成,窗口至少要有普通窗口、可滚动窗口、可滚动列表窗口(列表item可交互)等几个类型。
对于滚动窗口,还需要有滚动条,以及滚动惯性(快速滚动后松开鼠标,减速滑动一段距离直到停止),滚动极限反馈(超过滚动极限时会“弹”回来),列表Item长按功能(比如显示详情)

原型

以上一些功能窗口,和按钮都有一个共同点,就是可以点击交互,点击还要包括长按和非长按,以及按住滚动等,为此可建一个类叫 Clickable, 为了让它有 transform,可以作为 child 添加给别人我们要继承 PIXI.Container,先写一个简单的框架:

1
2
3
4
5
6
7
8
9
10
11
12
13
14
15
16
17
18
19
20
21
22
23
class Clickable extends PIXI.Container {
constructor(x = 0, y = 0, w = 0, h = 0) {
super();
this.x = x;
this.y = y;

//宽和高必不可少
this._width = w;
this._height = h;

//是否处于激活(可交互)状态
this._active = true;
}

get width() {return this._width;}
get w() {return this._width;} //宽的简称,为了以后可以偷懒
get height() {return this._height;}
get h() {return this._height;}

get active() { return this._active;}
Activate() { this._active = true;}
Deactivate() { this._active = false;}
}

在点击判断中,首先要判断点击是否在我们对象的区域内:

1
2
3
4
5
6
/**  @returns {boolean} */
IsMouseOver() {
//通过PIXI的原生函数 DisplayObject.worldTransform.applyInverse(p: Point) 可以方便地把全局坐标变成本地坐标
const pos = this.worldTransform.applyInverse(new Point(TouchInput.x, TouchInput.y));
return pos.x >= 0 && pos.x <= this.w && pos.y >= 0 && pos.y <= this.h;
}

接写来需要处理点击事件, 按照RM的风格我们把这个放到 update函数中。判定点击需要考虑以下情况:

  • 鼠标按下 -> OnPress
  • 鼠标按下后立即原地释放 -> OnRelease & OnClick
  • 鼠标按下一段时间后原地释放 -> OnRelease & OnLongPressRelease (长按后即使原地释放一般也不认为是点击,考虑到长按一般是弹出悬浮窗口显示详情,这是释放应该是窗口消失,直接触发点击并不适宜。)
  • 鼠标按下后移动到区域内另一位置释放 -> OnRelease & OnLongPressRelease
  • 鼠标按下后移动到区域之外 -> OnLongPressRelease (鼠标处于点击状态移动到区域之外,如果有长按悬浮窗这时也应该消失,所以也处理为长按释放)

整理之后代码如下:

1
2
3
4
5
6
7
8
9
10
11
12
13
14
15
16
17
18
19
20
21
22
23
24
25
26
27
28
29
30
31
32
33
34
35
36
37
38
39
40
41
42
43
44
45
46
47
_pressed = false; //记录“鼠标在区域内按下”
_longPressed = false; //记录“鼠标在区域内长按”
_pressPoint = new Point(0, 0); //记录鼠标按下的点坐标
_releasePoint = new Point(0, 0); //记录鼠标释放的点坐标

IsEnabled() {
return this.visible && this._active;
}

update() {
if (!this.IsEnabled()) return;

for (const child of this.children.reverse.clone()) {
if (child.update) {
child.update();
}
}

if (this._pressed) { //已经处于按下状态
if (this.IsMouseOver()) {
if (!this._longPressed && TouchInput.isLongPressed()) {
this._longPressed = true;
this.OnLongPress();
}
if(TouchInput.isReleased()) {
if(this._longPressed) {
this.OnLongPressRelease(true);
} else if(TouchInput.isClicked()){
this.OnClick();
}
this._pressed = false;
this._longPressed = false;
this.OnRelease();
}
} else { //鼠标在按下状态离开区域的情况
if(this._longPressed) {
this.OnLongPressRelease(false);
}
this._pressed = false;
this._longPressed = false;
this.OnRelease();
}
} else if (TouchInput.isTriggered()&&this.IsMouseOver()) { //开始按下
this._pressed = true;
this.OnPress();
}
}

接下来是几个触发事件的函数,为了方便测试这里先用几个 console.log 好查看效果:

1
2
3
4
5
6
7
8
9
10
11
12
13
14
15
16
17
18
19
20
21
22
23
24
25
26
27
28
29
30
31
32
33
34
35
36
37
38
39
40
41
42
43
44
45
46
47
48
49
50
_handlers = {};

/**
* @param {Function} func
* @param {Function} handle_func
* @param args
*/
SetHandler(func, handle_func, ...args) {
if(!this[func.name]) {
throw new Error(`No method named ${func.name} found!`);
} else {
this._handlers[func.name] = handle_func.bind(this, ...args);
}
}

CallHandler(name) {
if(this._handlers[name]) {
this._handlers[name]();
}
}
s
OnPress() {
this._pressPoint.set(TouchInput.x, TouchInput.y);
console.log('press');
this.CallHandler(this.OnPress.name);
}

OnRelease() {
this._releasePoint.set(TouchInput.x, TouchInput.y);
console.log('release');
this.CallHandler(this.OnRelease.name);
}

OnClick() {
console.log('click');
this.CallHandler(this.OnClick.name);
}

OnLongPress() {
console.log('long press start');
this.CallHandler(this.OnLongPress.name);
}

/**
* @param {boolean} isClick
*/
OnLongPressRelease(isClick) {
console.log(`long press release, this is${isClick?'':' not'} a click`);
this.CallHandler(this.OnLongPressRelease.name);
}

写好Clickable类之后便可以开始着手写Window了,不过在这之前还要做一些准备

Window 皮肤绘制

如同RM原生的Window皮肤,基本是一个正方形的格子,绘制的时候是把其上下左右边缘分别绘制,首先四个角按原样单独绘制,四条边进行长度缩放后绘制,中间填充双方向缩放绘制,这样可以将一个正方形在不失真的情况下绘成任意大小的矩形(上面的缩放也可以用 Tilemap 排列,取决于中间区域是不是纯色);为了方便起见为Bitmap单独写这样一个绘制皮肤的方法,难度没有,就是比较麻烦。

1
2
3
4
5
6
7
8
9
10
11
12
13
14
15
16
17
18
19
20
21
22
23
24
25
26
27
28
29
30
31
32
33
34
/**
* @param {Bitmap} bitmap
* @param {number} dx
* @param {number} dy
* @param {number} dw
* @param {number} dh
* @param {number} lx - 左边缘宽度
* @param {number} rx - 右边缘宽度
* @param {number} uy - 上边缘宽度
* @param {number} by - 下边缘宽度
*/
Bitmap.prototype.DrawTexture = function(bitmap, dx, dy, dw, dh, lx, rx = lx, uy, by = uy) {
let w = bitmap.width - lx - rx;
let h = bitmap.height - uy - by;

//left top
this.blt(bitmap, 0, 0, lx, uy, dx, dy, lx, uy);
//top
this.blt(bitmap, lx, 0, w, uy, dx + lx, dy, dw - lx - rx, uy);
//right top
this.blt(bitmap, lx + w, 0, rx, uy, dx + dw - rx, dy, rx, uy);
//left bottom
this.blt(bitmap, 0, uy + h, lx, by, dx, dy + dh - by, lx, by);
//bottom
this.blt(bitmap, lx, uy + h, w, by, dx + lx, dy + dh - by, dw - lx -rx, by);
//right bottom
this.blt(bitmap, lx + w, uy + h, rx, by, dx + dw - rx, dy + dh - by, rx, by);
//left
this.blt(bitmap, 0, uy, lx, h, dx, dy + uy, lx, dh - uy - by);
//right
this.blt(bitmap, lx + w, uy, rx, h, dx + dw - rx, dy + uy, rx, dh - uy - by);
//center
this.blt(bitmap, lx, uy, w, h, dx + lx, dy + uy, dw - lx - rx, dh - uy - by);
};

另外一个准备,就是写一个Paddings类,方便一点,不然每次都要写四个看起来比较乱,比较简单就不具体说明了:

1
2
3
4
5
6
7
8
9
10
11
12
13
14
15
16
17
18
19
20
21
22
23
24
25
26
class Paddings {
/**
* @param {number} left
* @param {number} top
* @param {number} right
* @param {number} bottom
*/
constructor(left = 0, top = left, right = left, bottom = top) {
this._left = left;
this._top = top;
this._right = right;
this._bottom = bottom;
}
_left = 0;
_top = 0;
_right = 0;
_bottom = 0;
/** @returns number */
get left() { return this._left; }
/** @returns number */
get top() { return this._top; }
/** @returns number */
get right() { return this._top; }
/** @returns number */
get bottom() { return this._bottom; }
}

Window

准备好之后可以开始写 Window 了,首先还是先思考一下需求。 Window 由标题、背景、内容构成。(标题我后来放弃,没什么用,就不提了,不过加进去也简单)。背景就是窗口的背景板,背景上画皮肤;而内容是一个透明的空白图片,是写文字图片等内容的地方,覆盖在背景上面,在二者都用 Sprite 作为载体:

1
2
3
4
5
6
7
8
9
10
11
12
13
14
15
16
17
18
19
20
21
22
23
24
25
26
27
28
29
30
31
32
33
34
35
36
37
38
39
40
41
42
43
44
45
46
47
48
49
50
51
52
53
54
55
56
57
58
59
60
61
62
63
64
65
66
67
68
69
70
71
72
73
74
75
76
77
78
79
80
81
82
83
84
85
86
87
88
89
90
91
92
93
94
95
96
97
98
99
100
101
102
103
104
105
106
107
108
109
110
111
112
113
114
115
116
117
118
119
120
121
122
123
124
125
126
127
128
129
130
131
132
133
134
135
136
137
138
139
140
141
142
143
144
145
146
147
148
149
class CustomWindow extends Clickable { //继承Clickable
_title = '';
_titleHeight = 0;
/** @type Bitmap */
_titleTexture;
/** @type Bitmap */
_backTexture;
_active = false;
/**
* @param {number} x
* @param {number} y
* @param {number} w
* @param {number} h
* @param {string} title - 标题:废弃了
* @param {string} titlebg - 标题皮肤(背景):废弃了
* @param {number} th - 标题高度:废弃了
* @param {string} bg - 皮肤(背景)
*/
constructor(x, y, w, h, title, th, titlebg = 'wd_title_cmn', bg = 'wd_back_cmn') { //以默认背景图片作为默认参数
super(x, y, w, h);
this._title = title;
this._titleHeight = th;
this._contentPaddings = new Paddings(12, 12, 12, 12); //内容paddings,即内容与内容 sprite 的边距
this.Create();
this.titleTexture = ImageManager.ImageManager.loadBitmap('img/ui', titlebg);
this.backTexture = ImageManager.loadBitmap('img/ui', bg);
this.Move(x, y, w, h);
}

get backTexture() { return this._backTexture;}
set backTexture(val) {
if (this._backTexture !== val) {
this._backTexture = val;
this._backTexture.addLoadListener(this.OnBackTextureLoaded.bind(this)); //因为读取图片需要时间,使用回调函数
}
}

get titleTexture() { return this._titleTexture;}
set titleTexture(val) {
if (this._titleTexture !== val) {
this._titleTexture = val;
this._titleTexture.addLoadListener(this.OnTitleTextureLoaded.bind(this));
}
}

/** @returns {Bitmap} */
get content() { return this._contentSprite.bitmap; }

/**
* content paddings
* @returns {Paddings}
*/
get paddings() { return this._contentPaddings; }

/** @returns number */
get contentAreaHeight() {return this.height - this._titleHeight;}
/** @returns number */
get contentHeight() { return this.contentAreaHeight - this.paddings.top - this.paddings.bottom; }
/** @returns number */
get contentWidth() { return this.width - this.paddings.left - this.paddings.right; }


/**
* 移动窗口,如果宽高发生变化则需要重新绘制
* @param {number} x - x coordinate
* @param {number} y - y coordinate
* @param {number} width
* @param {number} height
*/
Move(x = 0, y = 0, width = 0, height = 0) {
this.x = x;
this.y = y;
if (this._width !== width || this._height !== height) {
this._width = width;
this._height = height;
this.RefreshAllParts();
}
}

Close() {
this.Deactivate();
this.visible = false;
}

Open() {
this.visible = true;
}

// 创建Sprite
Create() {
this.CreateBackSprite();
this.CreateContentSprite();
this.CreateTitleSprite();
}

/** @type Sprite */
_titleSprite;
/** @type Sprite */
_backSprite;
/** @type Sprite */
_contentSprite;
CreateTitleSprite() {
this._titleSprite = new Sprite();
this.addChild(this._titleSprite);
}

CreateBackSprite() {
this._backSprite = new Sprite();
this.addChild(this._backSprite);
this._backSprite.move(0, this._titleHeight);
}

CreateContentSprite() {
this._contentSprite = new Sprite(new Bitmap(this.contentWidth, this.contentHeight));
this.addChild(this._contentSprite);
this._contentSprite.move(this.paddings.left, this._titleHeight + this.paddings.top);
}

//刷新窗口内容
OnTitleTextureLoaded() {
if (this._titleHeight > 0) {
let b = new Bitmap(this.width, this._titleHeight + 12);
b.DrawTexture(this.titleTexture, 0, 0, this.width, this._titleHeight + 4, this.TitleBorders.left, this.TitleBorders.right, this.TitleBorders.top, this.TitleBorders.bottom);
b.drawText(this._title, 0, 0, this.width, this._titleHeight + 4, 'center');
this._titleSprite.bitmap = b;
}
}

OnBackTextureLoaded() {
let b = new Bitmap(this.width, this.height - this._titleHeight);
b.DrawTexture(this.backTexture, 0, 0, this.width, this.height - this._titleHeight, this.BackBorders.left, this.BackBorders.right, this.BackBorders.top, this.BackBorders.bottom);
this._backSprite.bitmap = b;
}

RefreshAllParts() {
this.RefreshTexturePosition();
this.RefreshContent();
}

RefreshTexturePosition() {
this.OnTitleTextureLoaded();
this.OnBackTextureLoaded();
}

RefreshContent() {
this._contentSprite.bitmap = new Bitmap(this.contentWidth, this.contentHeight);
this._contentSprite.move(this.paddings.left, this._titleHeight + this.paddings.top);
}
}

此外还窗口还要有一些绘制函数,用来更方便地绘制文字、图片,这个参考原生的 Window 抄过来就可以了,就不再详细说明。